
How to Use Dermaplane Razor for Instant Radiance
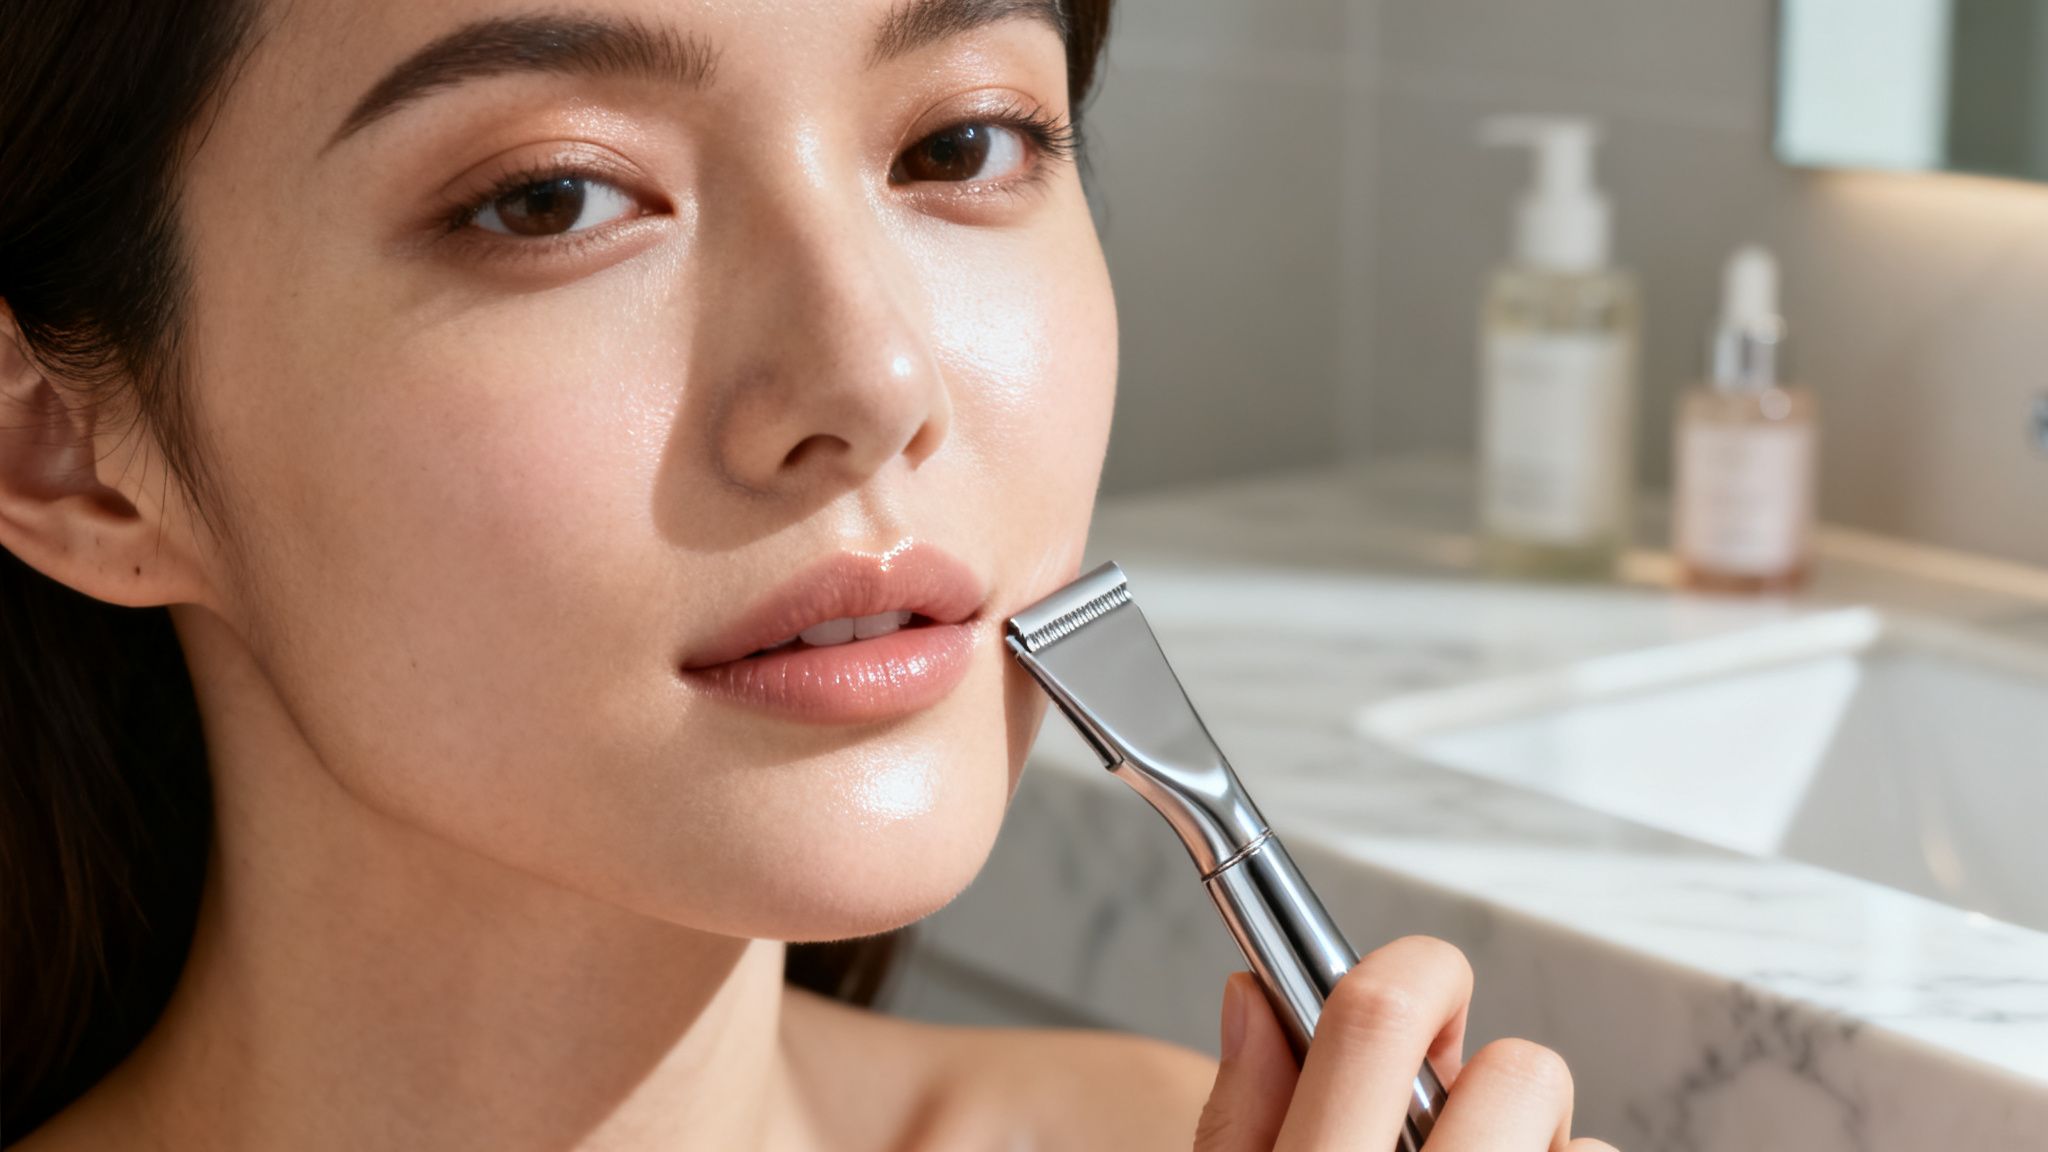
When you dermaplane at home, the goal is to glide a clean blade at a 45-degree angle across taut skin, using short, downward strokes. This gentle motion lifts away vellus hair (aka peach fuzz) and the top layer of dead skin cells, instantly revealing a smoother, more radiant complexion.
Your Guide to At-Home Dermaplaning

Dermaplaning has officially made its way from exclusive spa menus right into our own bathrooms. It's more than just a fancy way to shave your face; it's a sophisticated physical exfoliation that delivers an immediate glow that few other treatments can rival. By gently scraping away that outermost layer of dead skin and fine facial hair, you create the perfect canvas for everything that comes after.
This isn't some new-age fad, but its accessibility certainly is. The global fascination with DIY skincare has skyrocketed its popularity. In fact, the market for dermaplaning tools hit a massive USD 612.2 million in 2023 and is on track to reach USD 1.01 billion by 2030. That boom reflects a huge shift—people are learning how to use a dermaplane razor at home to get those pro-level results without the pro-level price tag.
What Is a Dermaplane Razor?
Let's be clear: a true dermaplane razor is not the same as your eyebrow shaper or a disposable body razor. It’s a specialized tool with a single, sharp, sterile blade designed specifically for the unique contours and delicate skin of the face.
The goal here is twofold: get rid of the peach fuzz that traps oil and makeup, and slough off the dull, dead skin cells that are dimming your shine. This is where using a quality, purpose-built tool becomes non-negotiable.
For example, the BARB N.P. Precision Dermaplaning Tool is engineered with both safety and effectiveness in mind. Its design features a precise blade angle and a comfortable grip, which helps prevent the nicks and irritation that often happen with the wrong tools. Using a razor made for the job ensures you’re actually exfoliating, not just giving your hair a trim.
The Core Benefits of Dermaplaning
Understanding why you’re doing this can really motivate you to perfect the technique. The instant gratification is amazing, but the long-term perks are what will make this a staple in your routine.
Here are the primary benefits you can look forward to:
- Flawless Makeup Application: Without a layer of peach fuzz and dead skin, your foundation and concealer glide on like a dream. You'll notice a much smoother, almost airbrushed finish.
- Enhanced Skincare Absorption: By clearing away that top layer of cellular debris, you're paving the way for your expensive serums and moisturizers to penetrate deeper and work more effectively.
- Instant Radiance: This is the most satisfying part. The moment you're done, you'll see brighter, more luminous skin. It’s the ultimate prep before a big event or anytime you want that "glass skin" effect.
- Gentle Exfoliation: If chemical exfoliants like acids are too harsh for your skin, dermaplaning is a fantastic physical alternative that’s often less irritating when done correctly.
Think of dermaplaning as manually polishing your skin. You're buffing away the old to reveal the smoother, newer layer just underneath. It’s all about creating clarity and brightness in a single, simple session.
To see where this fits into your overall beauty regimen, it can be helpful to compare it with different hair removal methods. While dermaplaning is first and foremost an exfoliation treatment, its ability to remove hair is a major part of its appeal. This guide is here to give you the confidence to perform this ritual safely and transform your skin from dull to dazzling.
Preparing Your Skin for a Flawless Glide
Think of your skin as the canvas for a masterpiece. You wouldn't start painting on a dirty, unprepared surface, right? The same principle applies here. Rushing your prep is one of the biggest mistakes you can make with dermaplaning, often leading to irritation, nicks, and a less-than-perfect result.
Taking a few extra minutes to properly prepare your skin is what sets the stage for that flawless, ultra-smooth glide you’re after. It makes all the difference.
First things first, your skin needs to be impeccably clean. This means getting rid of every last trace of makeup, sunscreen, oil, and the general grime that accumulates throughout the day. A quick swipe with a makeup wipe just won't cut it.
Your best friend for this step is the double-cleanse method. Start with an oil-based cleanser to dissolve and lift away stubborn makeup and sebum. Then, follow up with a gentle, water-based cleanser to wash everything away, leaving your skin perfectly clean without that stripped, tight feeling. This two-step ritual ensures the blade has a clear path and isn't dragging bacteria across your face.
The Great Debate: Dry vs. Oil
Once your skin is squeaky clean, the next critical step is making sure it's completely dry. Gently pat your face with a clean, soft towel. Any moisture left behind can cause the blade to skip or drag—a perfect recipe for irritation and tiny micro-cuts.
This brings us to a common question: should you dermaplane on bone-dry skin, or is it better to use a facial oil for a little slip? Honestly, the answer comes down to your skin type and what you're comfortable with.
Pro Tip: If you're new to this, start with completely dry skin for your first few sessions. It lets you get a feel for the blade and how it moves across your skin without any other variables. As you get more confident, you can start experimenting.
Working on dry skin provides maximum exfoliation because there’s no barrier between the blade and the dead skin cells. This is the traditional method professionals use for the most effective removal of peach fuzz and buildup.
However, if your skin is on the sensitive or very dry side, the dry method might feel a bit too abrasive. This is where a high-quality, non-comedogenic facial oil can be a game-changer.
Applying a very thin layer creates a gentle cushion, letting the blade glide more smoothly and reducing the risk of irritation. It’s a fantastic option if you’re prone to redness or just want a more comfortable experience.
A lightweight, non-comedogenic facial oil is a superb choice for this. Look for formulas designed to give you just enough slip for your dermaplane razor without clogging your pores. A couple of drops is all you need.
Here’s a quick guide to help you decide:
| Skin Condition | Recommended Prep Method | Why It Works |
|---|---|---|
| Oily or Combination Skin | Completely Dry Skin | Allows the blade to make direct contact for maximum removal of dead skin and oil buildup. |
| Dry or Mature Skin | Thin Layer of Facial Oil | Provides a protective barrier, reduces friction, and helps prevent over-drying the skin. |
| Sensitive or Reactive Skin | Thin Layer of Facial Oil | Minimizes potential irritation and redness by creating a smoother, more gentle glide for the blade. |
Ultimately, great prep is all about creating the perfect environment for the tool to work safely and effectively. Whether you choose a dry surface or a touch of oil, being intentional is key. This small bit of effort pays off big time, ensuring your skin is not just fuzz-free but also calm, happy, and glowing.
While dermaplaning is a form of physical exfoliation, understanding how it differs from other methods is also beneficial. You can learn more about a different approach in our detailed article on what is chemical exfoliation.
Mastering Your Dermaplaning Technique
Now that your skin is perfectly prepped, we can get to the most important part: learning how to use that dermaplaning razor with total confidence. The right technique is what separates a flawless, professional-grade result from an amateur attempt. It all comes down to control, angles, and gentle, deliberate movements.
Your goal is to glide, not scrape. Think of it as delicately sweeping away debris rather than aggressively shaving. This mindset is crucial for protecting your skin barrier and achieving that coveted smooth finish without a hint of redness or irritation.
The Art of the 45-Degree Angle
The angle you hold the blade at is everything. If you hold it too upright (at 90 degrees), you risk scraping and nicking your skin. Hold it too flat, and it won't effectively lift the hair and dead skin.
The sweet spot is a 45-degree angle to your skin's surface. This specific position allows the blade to catch those fine vellus hairs and the very top layer of dead skin cells with minimal pressure. It’s simply the most efficient and safest way to exfoliate.
To get a feel for this, hold your BARB N.P. Precision Dermaplaning Tool and practice the angle on the back of your hand—without a blade, if you're nervous—before you even think about touching your face.
Creating the Perfect Surface
For the blade to glide like butter, it needs a flat, stable surface. This is where your other hand becomes your best friend. You need to create just enough tension in the skin to prevent the blade from catching on any loose areas.
Use your free hand to gently pull the skin taut. For example, when you’re working on your cheek, place your fingers near your hairline and pull back slightly. This simple action creates a drum-like surface, making it much easier for the razor to move evenly and preventing any accidental nicks.
A taut surface is non-negotiable for a safe dermaplaning session. It ensures the blade only interacts with the very top layer of skin, giving you a clean, even result every time.
Now that you have the angle and surface tension down, let's talk about the motion.
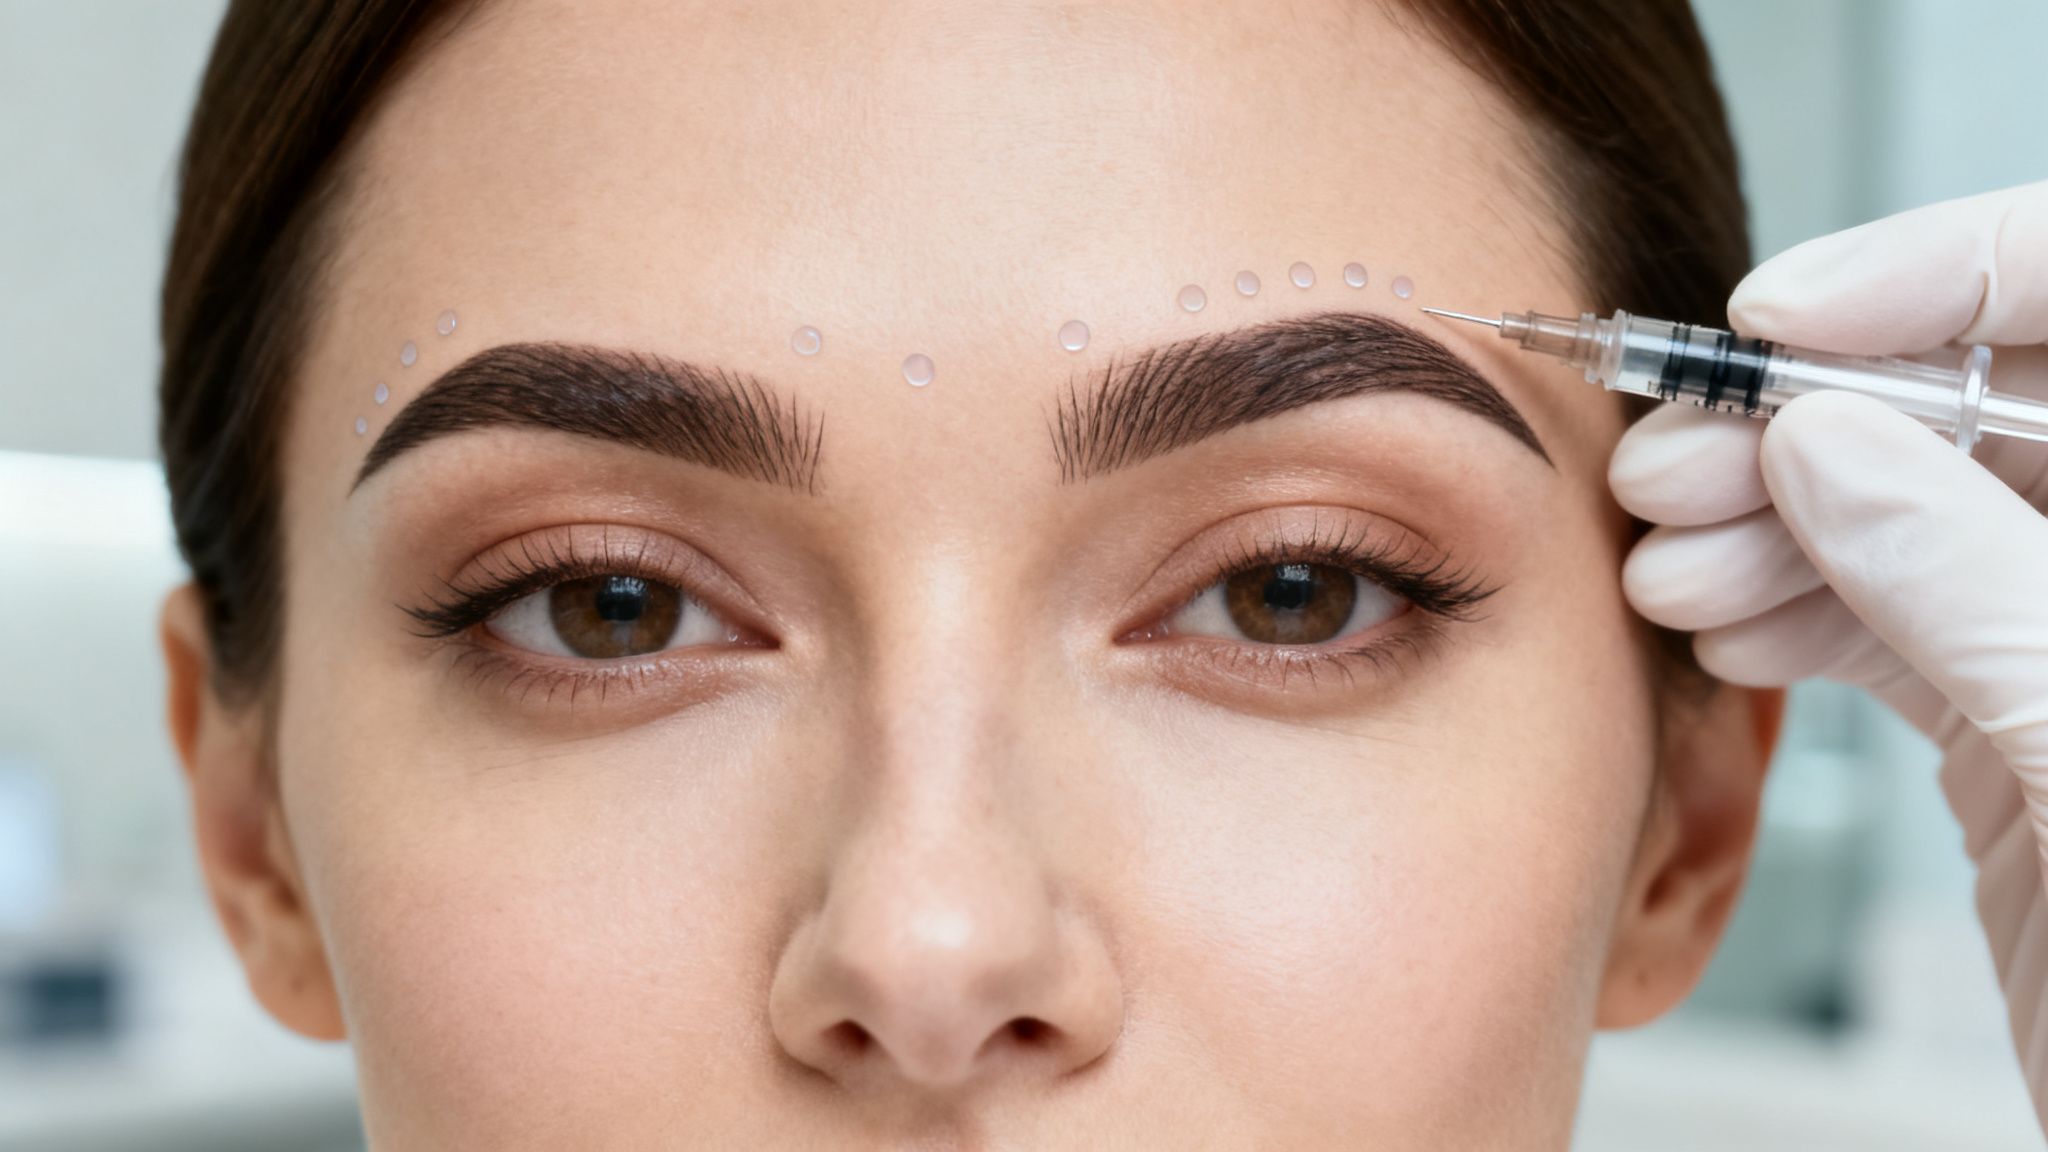
This visual guide breaks down the simple but essential steps to prepare your skin before you even pick up the razor.
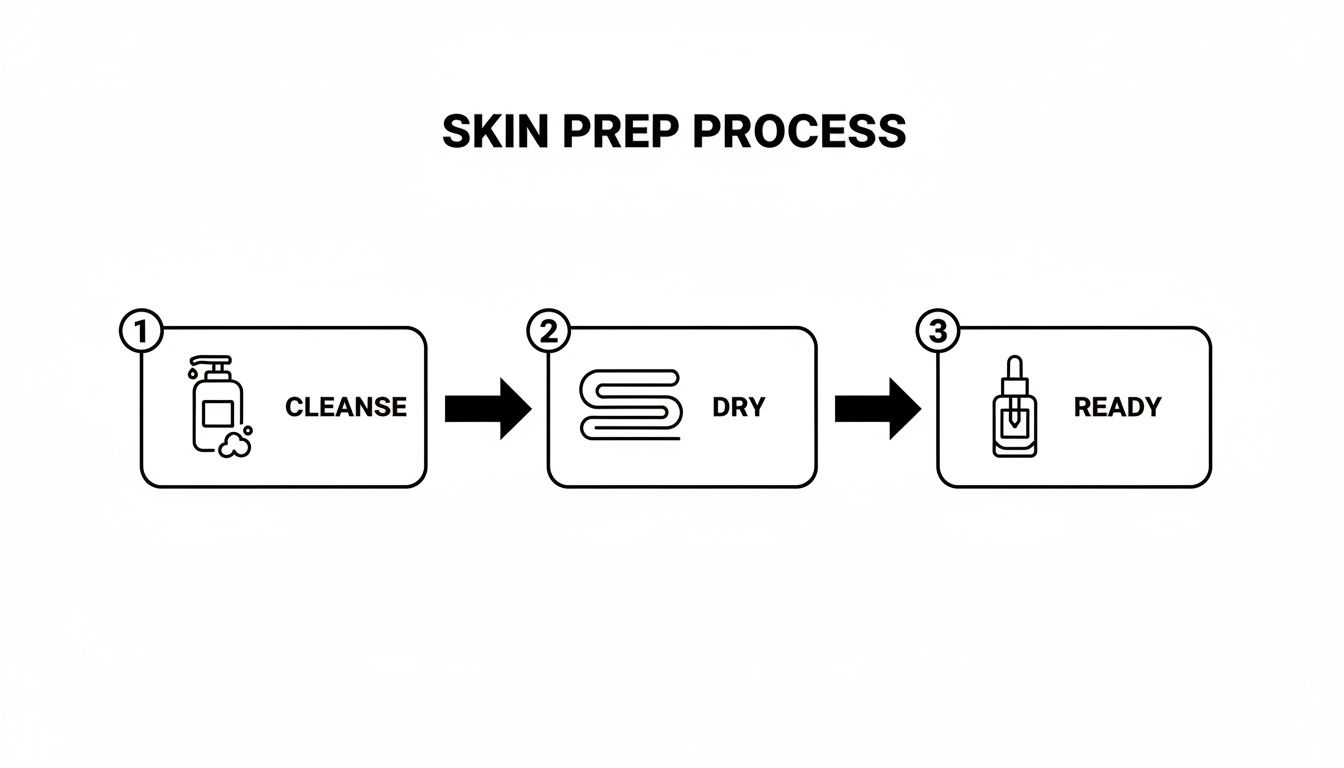
Starting with a thoroughly cleansed and completely dry canvas is the foundation for a successful and irritation-free experience.
Navigating Your Face Safely
The key is to use short, gentle, downward strokes. Think of them as light, feather-like movements, almost like you’re sketching on your skin. Long, sweeping motions just increase the risk of error and uneven results. Let the blade do the work; there's absolutely no need to apply pressure.
Here’s a safe path to follow across your face:
- Start with the Larger Areas: Begin at the top of your cheekbone near your hairline and work your way down toward your nose in short strokes. After each little pass, wipe the blade clean on a cotton pad or tissue to remove buildup.
- Move to the Forehead: Hold the skin taut above your eyebrow and gently stroke downward. Be extremely careful around the delicate hairline and eyebrow areas.
- Tackle the Chin and Jawline: Pull your chin skin taut and use downward strokes. For the jawline, you can pull the skin up toward your ear to create a flatter, easier surface to work on.
- Address the Upper Lip: This area can be a little tricky. You can puff out your upper lip or use your tongue to push the skin out from the inside, creating a firmer area. Use very light, downward strokes here.
Remember to map out your face and only go over each section once. Overlapping too many times is a fast track to over-exfoliation and sensitivity.
There are also several "no-go zones" where you should never, ever use a dermaplane razor. These areas are either too delicate, too contoured, or prone to injury.
Areas to Completely Avoid:
- Eyelids and Under-Eyes: The skin here is far too thin and delicate for a blade. Don't even think about it.
- Directly on the Nose: The bony, curved structure makes it nearly impossible to maintain the proper angle safely.
- Lips: Never use the blade on your actual lips.
- Active Breakouts or Acne: Dermaplaning over a pimple can spread bacteria and worsen inflammation, which can lead to scarring.
- Any Moles, Skin Tags, or Open Wounds: Avoid these areas entirely to prevent injury and irritation.
By mastering the angle, keeping your skin taut, and following a safe path, you build the confidence you need for a successful session. Each controlled stroke is a step toward that incredibly smooth, radiant skin you're aiming for.
The Essential Post-Dermaplaning Aftercare
A great dermaplaning session is only half the battle. What you do right after is what truly secures that flawless, lasting glow. Your skin is in a unique state—perfectly exfoliated and incredibly receptive, but also more vulnerable than usual.
Think of your fresh skin as a sponge, ready to soak up whatever you give it. This is your prime opportunity to deliver intense hydration and calming ingredients exactly where they can do the most good. The right aftercare will soothe, protect, and seriously amplify your results.
Immediate Soothing and Hydration
The very first thing your skin is craving is moisture and calm. You’ve just removed a layer of dead cells and peach fuzz, so it’s completely normal for it to feel a little exposed. Rehydrating immediately is non-negotiable for keeping your skin barrier happy.
Grab a gentle, hydrating serum. Ingredients like hyaluronic acid are fantastic here because they pull moisture into the skin, plumping it from the inside out. A calming facial mist with aloe or cucumber can also offer instant relief and dial down any mild redness.
Natural oils are another great option. For instance, you can discover the Jojoba Oil Pure Benefits and see how it can deeply hydrate your skin without the risk of clogging pores.
Give Your Skin a Break From Actives
This is a hard and fast rule. Your skin just went through a major physical exfoliation, and hitting it with powerful active ingredients is a one-way ticket to irritation and a compromised skin barrier.
For at least 24-48 hours after your session, you absolutely must avoid any harsh or potent skincare. Your goal is to coddle your skin, not challenge it.
That means putting these on the back shelf for a couple of days:
- Retinoids (Retinol, Tretinoin)
- Exfoliating Acids (AHAs like glycolic acid, BHAs like salicylic acid)
- Vitamin C Serums (Especially high-strength formulas)
- Scrubs or any other physical exfoliant
- Acne treatments with benzoyl peroxide
Keep it simple: a gentle cleanser, a hydrating serum, and a nourishing moisturizer. Let your skin recover and just enjoy its new smoothness.
Amplify Your Glow With Advanced Care
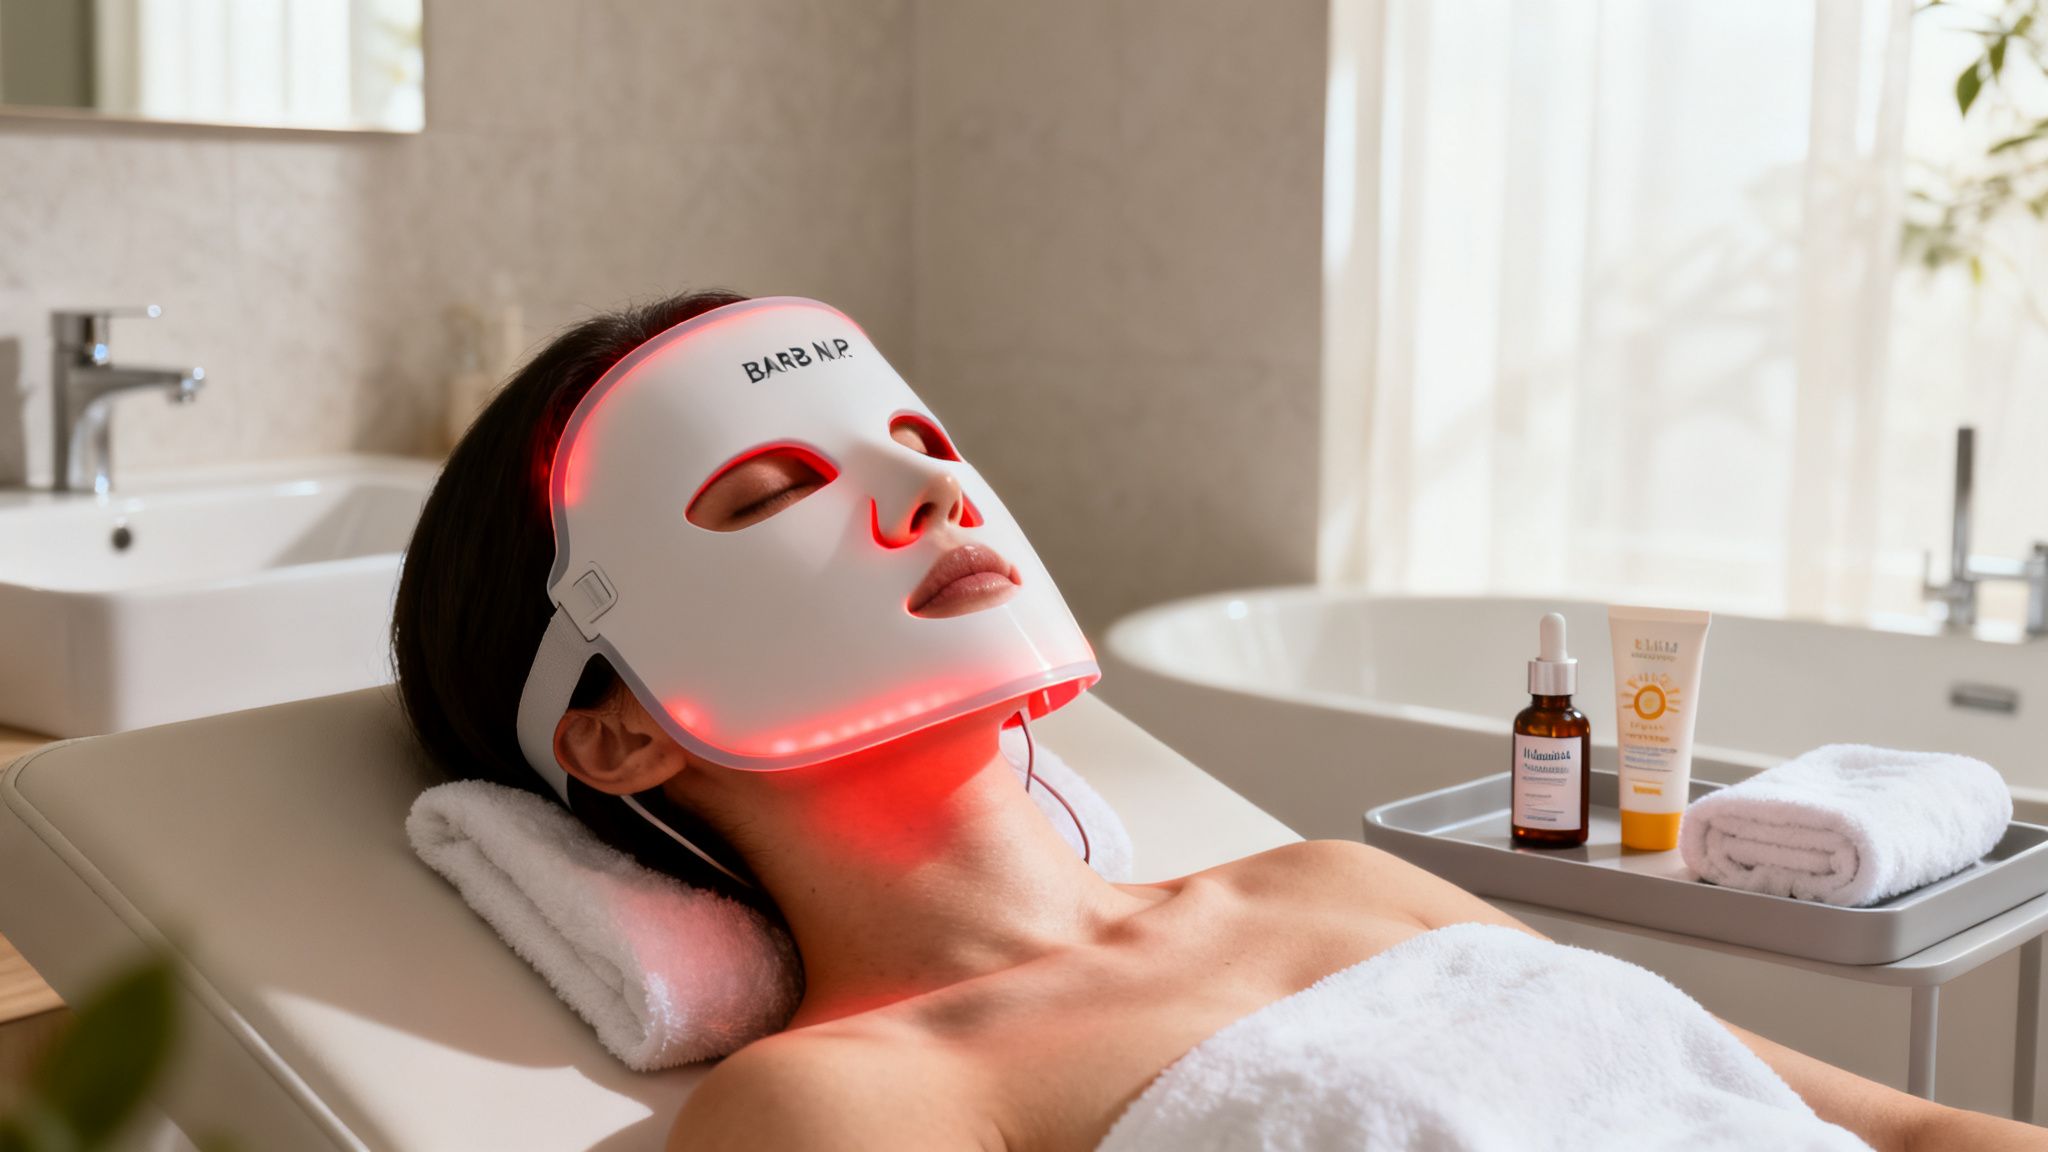
Once you’ve applied your initial hydrating products, you can take your aftercare to the next level. This is the perfect time to introduce a treatment that calms inflammation while boosting your long-term results.
The BARB N.P. LED Facial Mask is the ultimate post-dermaplaning tool. It brings a spa-level experience right into your home. Its wireless design means you can actually relax without being stuck next to an outlet, and it's so lightweight and comfortable you'll barely notice it's on.
This mask is more than just a relaxing gadget; it’s a multi-functional device with 3 distinct lighting settings to address your skin's immediate needs:
- Red Light Therapy: This is your go-to for calming things down. Red light penetrates deep to reduce inflammation and kickstart collagen production, helping your skin heal faster and look plump.
- Blue Light Therapy: Because your pores are freshly cleared, they can be more susceptible to bacteria. Blue light zaps acne-causing bacteria, making it an amazing preventative step against post-treatment breakouts.
- Amber Light Therapy: This setting is all about enhancing the glow. Amber light helps reduce redness and improve lymphatic flow, bringing out that radiant, even complexion you just worked to reveal.
Using the mask for just 10-15 minutes after dermaplaning can make a huge difference in your recovery time and the quality of your final results.
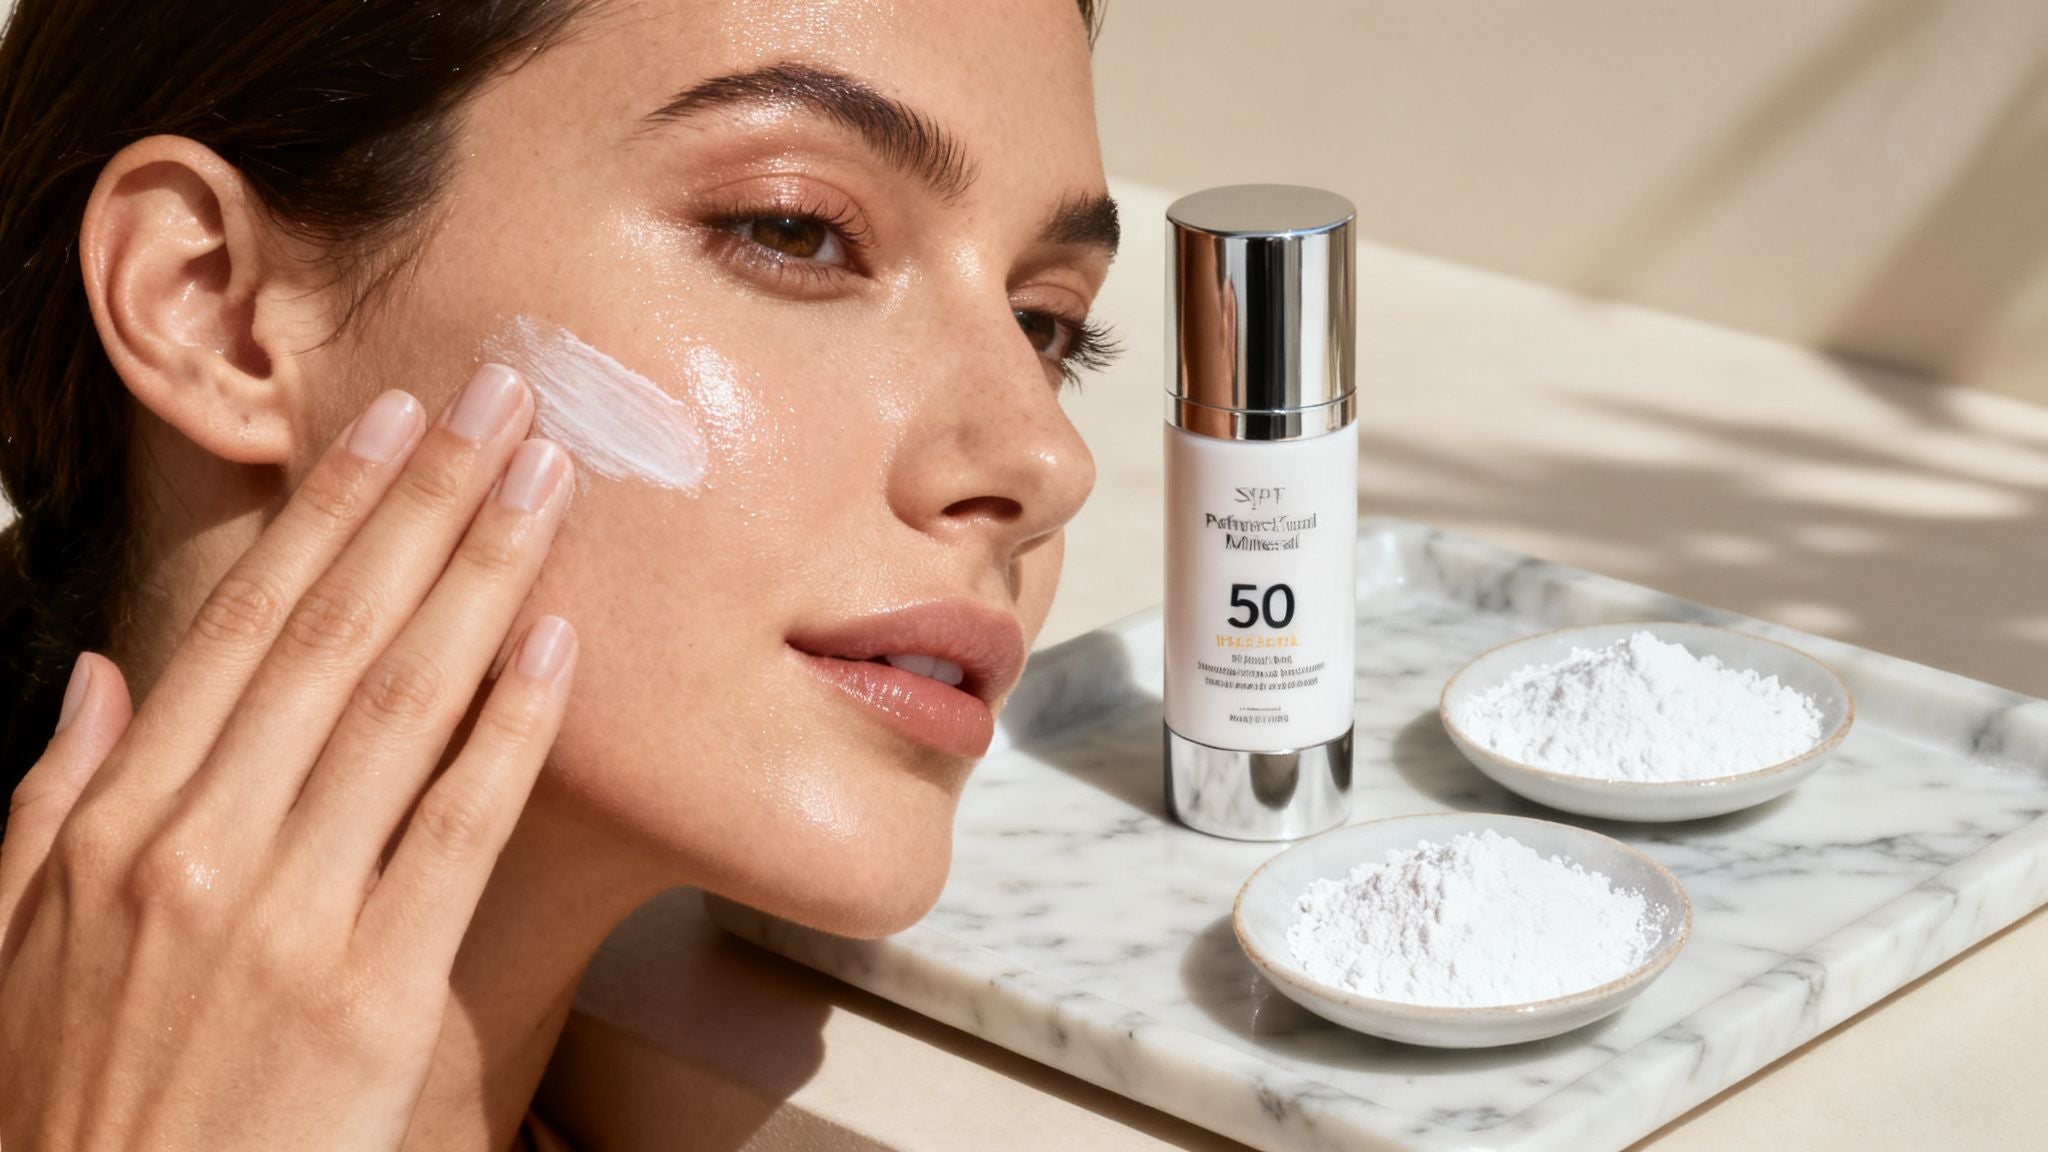
The Final, Crucial Step: Sun Protection
After all that work, the last thing you want is for sun damage to ruin your progress. Your freshly exfoliated skin is extremely sensitive to UV rays. Skipping sunscreen is simply not an option.
Every single morning, apply a broad-spectrum sunscreen with at least SPF 30. This shields those new, delicate skin cells from damaging UVA and UVB rays, preventing dark spots and preserving your smooth, bright finish. If you want to dive deeper into finding the right one, check out our guide on how to choose sunscreen.
Common Dermaplaning Mistakes to Avoid
Even with the best instructions, the path to that perfect glow can have a few bumps. Let's walk through the most common missteps I see, so your at-home sessions are always safe, effective, and leave your skin looking its best. Think of this as your troubleshooting guide for getting professional-level results every single time.
One of the biggest culprits behind a bad experience is a dull blade. It might seem harmless, but a dull dermaplane razor doesn't glide; it drags across your skin. That pulling is a one-way ticket to nicks, irritation, and a patchy, uneven exfoliation. A fresh, sharp blade is your best insurance policy.
Using the Wrong Tools or Pressure
A dull blade isn't just inefficient—it can also harbor bacteria, which is the last thing you want near freshly exfoliated skin. For your safety and for the best performance, your blade needs to be pristine for every single session.
So, how do you avoid this? Simple: replace your blade regularly.
- When to Replace: With the BARB N.P. Precision Dermaplaning Tool, I recommend using a fresh blade for every one to two sessions. This guarantees you always have the sharpest, most hygienic edge for that flawless, smooth glide.
- Why It Matters: A truly sharp blade requires almost no pressure. This brings us to the next common mistake.
Leaning in with too much pressure is another major pitfall. The whole point of dermaplaning is to gently lift away dead skin cells and vellus hair, not to scrape your face raw. Pressing too hard is a direct path to creating micro-cuts, triggering inflammation, and leaving your skin red and angry.
Remember, the motion should be light as a feather. Let the weight of the tool and the sharpness of the blade do the work. If you feel like you need to press hard, that’s your sign the blade is too dull.
Ignoring Your Skin's Condition
Your skin isn't the same every single day. Knowing when not to dermaplane is just as important as knowing how to do it correctly. The most dangerous mistake is dermaplaning over active acne, inflamed pustules, or any kind of open sore.
Doing so can easily rupture a blemish, spreading bacteria all over your face and leading to more breakouts or even scarring. If you have an active pimple, just work around it. Leave a generous margin. Your skin will thank you.
Another frequent error is going over the same area multiple times in one session. It’s tempting to try and get every last bit of fuzz, but this is a classic case of "too much of a good thing." Repetitive passes lead to over-exfoliation.
This strips your skin's protective barrier, causing:
- Redness and irritation
- Excessive dryness and flaking
- Heightened sensitivity to your other products
Stick to one or two gentle passes per area. That’s it. If you want to learn more about finding the right exfoliation balance, our guide on how often you should exfoliate your face dives deeper.
Finally, don't undo all your hard work by skipping aftercare. Freshly exfoliated skin is incredibly absorbent but also extremely vulnerable. Skipping hydration or, even worse, forgetting sunscreen leaves your delicate new skin cells exposed to irritation and UV damage. Always, always follow up with a calming, hydrating serum and a broad-spectrum SPF to protect that beautiful glow you just worked for.
Common Dermaplaning Questions, Answered
Even after you’ve nailed the technique, a few questions are bound to pop up. Let's walk through the most common concerns I hear from my clients, so you can feel totally confident every time you pick up your razor.
Will My Hair Grow Back Thicker or Darker?
This is the number one myth I have to bust, and the answer is a hard no. Dermaplaning shaves the vellus hair (that soft peach fuzz) right at the skin's surface.
When it grows back, the tip is blunt for a short time, which can feel a little different if you touch it. But the treatment absolutely does not—and cannot—change your hair’s texture, color, or how fast it grows. The follicle deep beneath the skin is completely untouched.
How Often Should I Dermaplane My Face?
For most skin types, aiming for once every 3 to 4 weeks is the sweet spot. This timing works in harmony with your skin's natural renewal process, which takes about 28 days.
Doing it more often is a recipe for over-exfoliation. You risk stripping your skin’s protective barrier, which can lead to redness and irritation. Always listen to what your skin is telling you. If it feels sensitive, give it extra time to recover before your next session.
Think of it like this: You're clearing away a month's worth of dead skin and debris. Let your skin finish its natural cycle before you exfoliate again. That way, you're working with your skin, not against it.
Is Dermaplaning Safe for Acne or Sensitive Skin?
Proceed with caution. If you know your skin is on the sensitive side, do a small patch test on a hidden area (like right in front of your ear) a full 24 hours before you plan to do your whole face.
This is critical: you must avoid going over any active acne, whether it’s a whitehead, pustule, or a deeper cystic spot. Gliding a blade over a breakout is a surefire way to spread bacteria, trigger more inflammation, and even cause scarring. If you have chronic conditions like rosacea or eczema, at-home dermaplaning isn't for you. When in doubt, a professional consult is your safest move.
What's the Difference Between a Dermaplane Razor and an Eyebrow Razor?
They might look similar, but they are built for entirely different purposes. Using the right tool is non-negotiable for getting good, safe results.
- Dermaplaning Tools: A purpose-built tool like the BARB N.P. Precision Tool uses a single, high-grade, ultra-sharp blade made for facial exfoliation. It’s designed with safety guards to prevent nicks while effectively sweeping away dead skin cells.
- Eyebrow Razors: These are made for trimming and shaping coarse brow hairs in a tiny area. The blades are typically shorter, not as sharp, and definitely not designed to exfoliate layers of skin across your entire face.
Trying to dermaplane with an eyebrow razor often leads to irritation, disappointing results, and a much higher risk of cutting yourself. Stick to the tool that was actually made for the job.
Elevate your post-dermaplaning routine with advanced care. To calm inflammation and boost your glow, explore the BARB N.P. LED Facial Mask, an essential tool for soothing and enhancing your freshly exfoliated skin. Discover more expert-curated skincare solutions at barbnp.shop.
%20and%20...)