Cheek Filler Aftercare Sleeping: A Day-by-Day Guide
You're home from your appointment, your cheeks feel full and a little tender, and now it's bedtime. You lie down, turn toward your usual side, then stop and wonder whether one night of pressure could change the result. That worry is understandable, but cheek filler aftercare sleeping is simpler than many strict rules make it sound. Sleep position mainly helps you limit swelling, bruising and avoidable irritation during the first night or two. It doesn't guarantee a result, and it doesn't prevent rare complications. Use the timelines and fallback plans below to stay comfortable, know what to check, and know when to call your injector instead of waiting until morning.
Sleep Position Timeline for the First Two Weeks
For the first 24 hours, sleep on your back with your head modestly raised on a wedge or two supportive pillows. Keep the treated cheek off the pillow, don't press it with a hand, and don't massage it to check whether it feels even. Early pressure and rubbing can aggravate normal injection site swelling and bruising, so a quiet first night makes morning changes easier to judge. Treat this as pressure control and a comfort precaution, not a promise about your final shape.
What the Healing Window Looks Like
The U.S. Food and Drug Administration dermal filler guidance states that swelling and bruising usually occur shortly after dermal-filler injections and commonly resolve within a few days to several weeks. Product, depth, technique and healing vary, so use the timeline as a guide rather than a deadline.
| Recovery window | Sleep position | Action or check |
|---|---|---|
| First night (0 to 12 hours) | Back, head raised on a wedge or two pillows | Cold pack only briefly if swollen; no pressing or massage |
| Hours 12 to 24 | Back, head modestly elevated | No strenuous exercise, heat or extended sun |
| Days 2 to 3 | Back or upright, elevated | Keep elevation while swelling is still significant |
| Days 4 to 7 | Gradual return to usual position once comfortable | Stop side pressure if tenderness returns; confirm with injector |
| Days 7 to 14 | Usual sleep as swelling settles | Track swelling and bruising; note any change |
| Beyond 14 days | Normal sleep unless the injector says otherwise | Contact your doctor or injector if problems persist |
How to Use This Timeline
Find your current window, follow the position, then check the action column before making any other decision. If tenderness returns when you try your usual side on day four, go back to back sleeping that night instead of pushing through. For practical help staying aligned while you adapt, back sleeping advice from Lott's Furniture is useful context for pillow placement and spinal support.
Don't judge symmetry in the first few days, when one side may swell more than the other. Reviewing realistic cheek filler before and after results can help you focus on the settled outcome rather than night one puffiness. Sleep position supports comfort and limits avoidable pressure; it does not prevent rare complications, so report increasing pain, color change, or unusual firmness to your injector promptly.
Practical rule: Protect the first night, ease off gradually, and let comfort plus your injector's advice decide the return to side sleeping.
How to Set Up Your Bed for the First 24 Hours
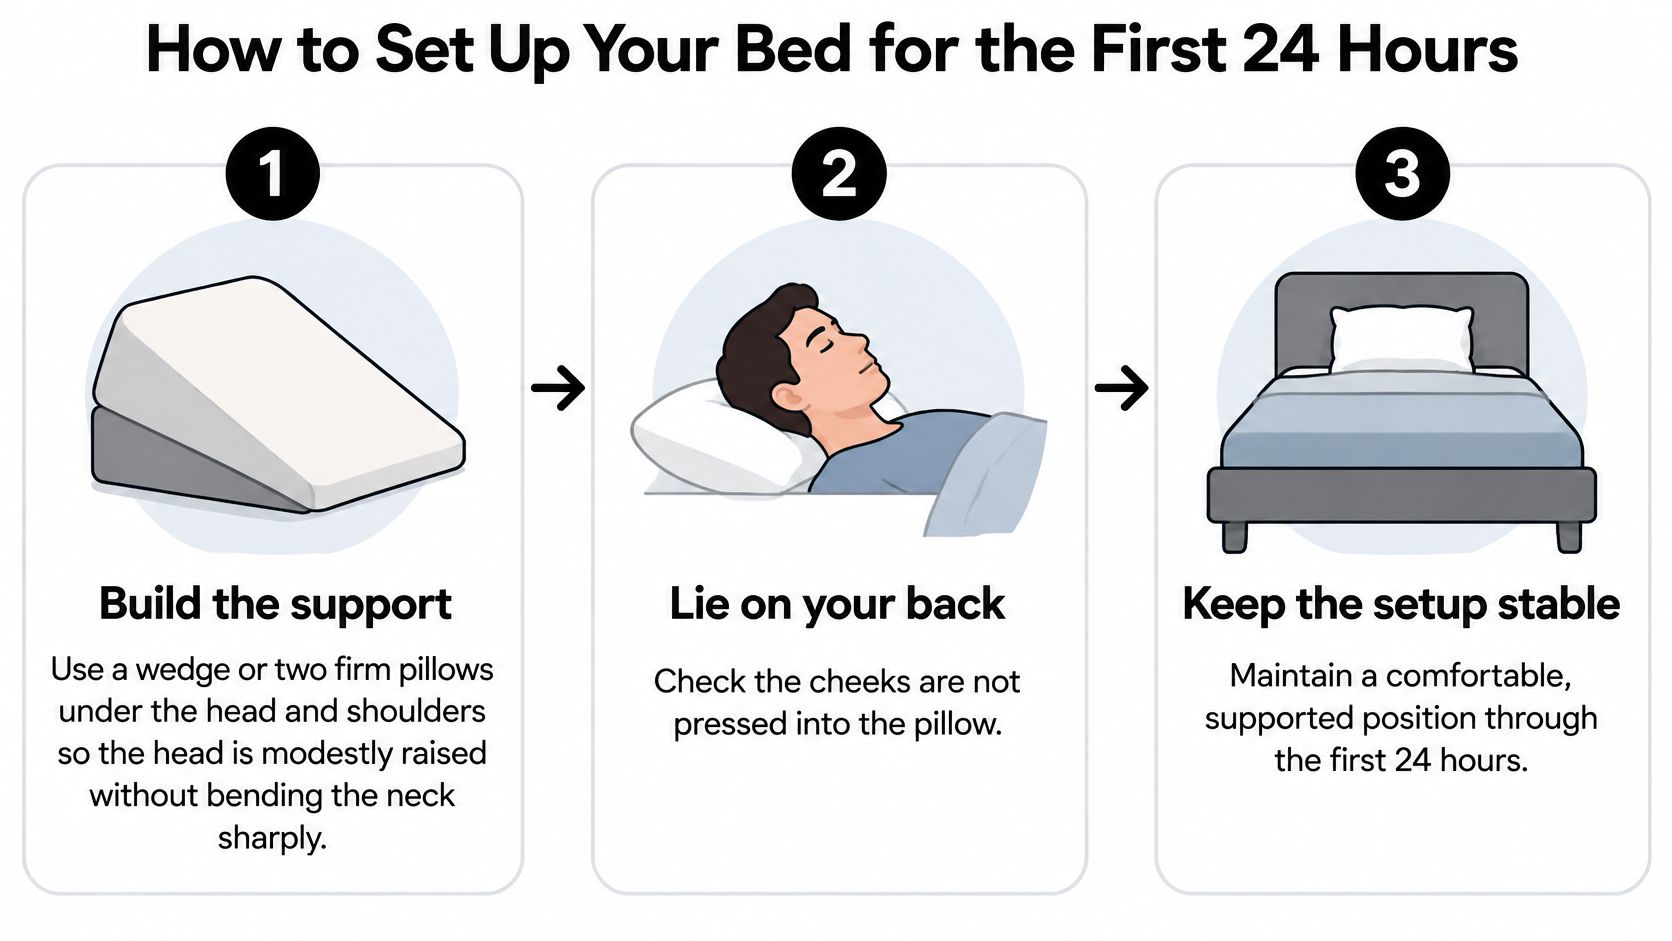
You get home late, the treated area feels tender, and the last thing you want is to improvise pillows at midnight. A controlled setup beats trying to hold an awkward position all night. A dermatology aftercare protocol for fillers recommends avoiding side or stomach sleeping for 24 hours, because external pressure may contribute to product displacement, and keeping elevation for 2 to 3 days if swelling is significant. Build the bed before you are tired.
Seven Steps for Night One
- Build the support: Place a wedge or two firm pillows under your head and shoulders. Aim for gentle elevation, not a sharply bent neck you will abandon at 2 a.m.
- Settle on your back: Lie face up and check that neither cheek rests against the pillow. Shift toward the center if one side is compressed.
- Use a clean pillowcase: Choose soft fabric and skip tight sleep masks, headbands or anything that presses across the cheekbones. Pressure adds irritation to tender tissue.
- Keep hands away: Do not repeatedly touch, palpate or massage the area unless your injector directed it. Frequent checking makes redness and swelling harder to interpret.
- Reset calmly if you roll: If you wake on your side, roll gently back without pushing through the cheek. Do not press the area to test it.
- Cool briefly only if needed: Use a cold pack for a short period when the area is swollen, and ask your injector how long it may stay in place. Long, repeated icing is not better.
- Do one morning check: Compare symmetry, colour and comfort with the day before, then leave the area alone. One calm look gives you more useful information than hourly mirror checks.
If your bed can be adjusted, understanding the zero gravity sleep position can help you raise the head without stacking pillows into an unstable pile. That position supports the back while keeping your face clear.
Keep the first 24 hours gentle by avoiding strenuous exercise and heat, since both can temporarily increase redness and swelling. Sleep position is a comfort and swelling precaution, not a safety guarantee. A comfortable, settling morning usually means mild puffiness and tenderness that are not sharply worse than the night before, with skin colour that looks like your usual tone apart from a bruise.
Fallback Plans for Side Sleepers, CPAP Users and Pregnancy
Back sleeping is not realistic for everyone. Pregnancy, reflux, sleep apnea, neck pain and limited mobility can make a flat supine position impractical, and a rigid rule fails when you cannot follow it. The Cleveland Clinic cheek filler guidance advises back sleeping to avoid disrupting cheek filler, but it does not establish exactly how many nights are necessary or whether a brief accidental roll changes filler position.

Practical Alternatives by Situation
| Situation | Practical fallback | Ask first |
|---|---|---|
| Side sleeper | Sleep on your back for the first night, then ease back when your injector agrees | Injector |
| Accidental roll onto the treated cheek | Roll back gently, avoid pressing, check the area once | Injector if pain or colour change appears |
| Pregnancy or reflux | Raise the upper body with a wedge | Obstetric provider or injector |
| CPAP mask | Loosen straps, keep the mask off the treated cheek, check fit | Sleep clinician and injector |
| Neck pain | Use a contoured pillow that supports without pressing cheeks | Doctor or physical therapist |
| Limited mobility | Use a recliner or upright bed for the first 24 to 48 hours | Injector |
A side sleeper can place a pillow behind the back and another under the knees, which makes rolling back easier without a tight nest around the face. Pregnancy and reflux worsen when lying flat, so raise the upper body from the waist rather than propping only the head. CPAP users need a seal that holds without straps biting across the cheekbones. If the mask leaks when straps are loose, ask the sleep clinician to refit it rather than accepting a sore cheek. For neck pain, a contoured pillow that supports the cervical curve while leaving the cheek free often works better than a wedge alone.
If you use a recliner or sleep in a living room for a few nights, setup matters. You can plan your sofa and ottoman layout so a water bottle, pillows and a cold pack stay within reach without twisting toward the treated side. Keep the recliner back high enough that your head is raised, and place the cold pack where you can reach it without pressing the cheek into a cushion.
If you wake on the treated side, roll back gently and note how the cheek feels. Contact your injector if pain escalates, colour changes, or asymmetry persists. I would not treat one accidental roll as a failed result; the useful question is whether pain, colour or symmetry changed. Your treating clinician's instructions override any generic fallback, especially with pregnancy, CPAP therapy or a neck condition.
Elevation and avoiding direct cheek pressure are two separate goals. If you can't do both perfectly, prioritize the plan your clinician considers safest for you.
Daytime and Night Habits That Ease Swelling
By mid-morning the cheek often looks fuller than it did in the treatment chair. Daytime handling decides how much of that puffiness you carry into the next night. Treat the first 24 to 48 hours as one pressure and swelling plan, not a sleep-only problem.
An evidence synthesis of hyaluronic-acid injection reactions reported pooled swelling of 40.7% (95% CI, 22.3 to 62.1%), and cheek treatment accounted for 43% of adverse-event locations in one cited analysis. Those pooled rates describe how often swelling follows hyaluronic-acid filler, which is why early puffiness is expected. Position and cooling can limit how swollen and sore the cheek feels. They do not guarantee an even result.
A Simple Daily Routine
I use the same limits day and night while the cheek is still puffy: less pressure, less heat, short cooling, and a light cleanse.
- Keep your head raised at night: Use the wedge or pillows while swelling remains noticeable.
- Use brief cooling: Apply a cold compress only within the guidance your injector or product labeling gives you.
- Avoid heat and vigorous exercise: Skip saunas, hot showers on the face and intense workouts during the early window, since heat can temporarily increase redness and swelling.
- Remove pressure sources: Choose loose headwear and avoid tight masks, helmets or facial massage over the treated cheek.
- Cleanse gently: Use light pressure, clean hands and no scrubbing across injection sites.
Track change without handling the face. One photo a day, in the same light, at the same time and from the same distance, shows whether the cheek is settling or swelling again after it had started to ease. Compare that sequence across two weeks. The dermal filler aftercare guide covers complementary routines for cleansing and returning to activity.
Persistent asymmetry, increasing warmth or redness, nodules, or worsening swelling after the initial recovery period needs clinician review. Delayed inflammatory events are uncommon. A quiet first night does not mean a later change can wait.
Red Flags That Mean Call Your Injector Now
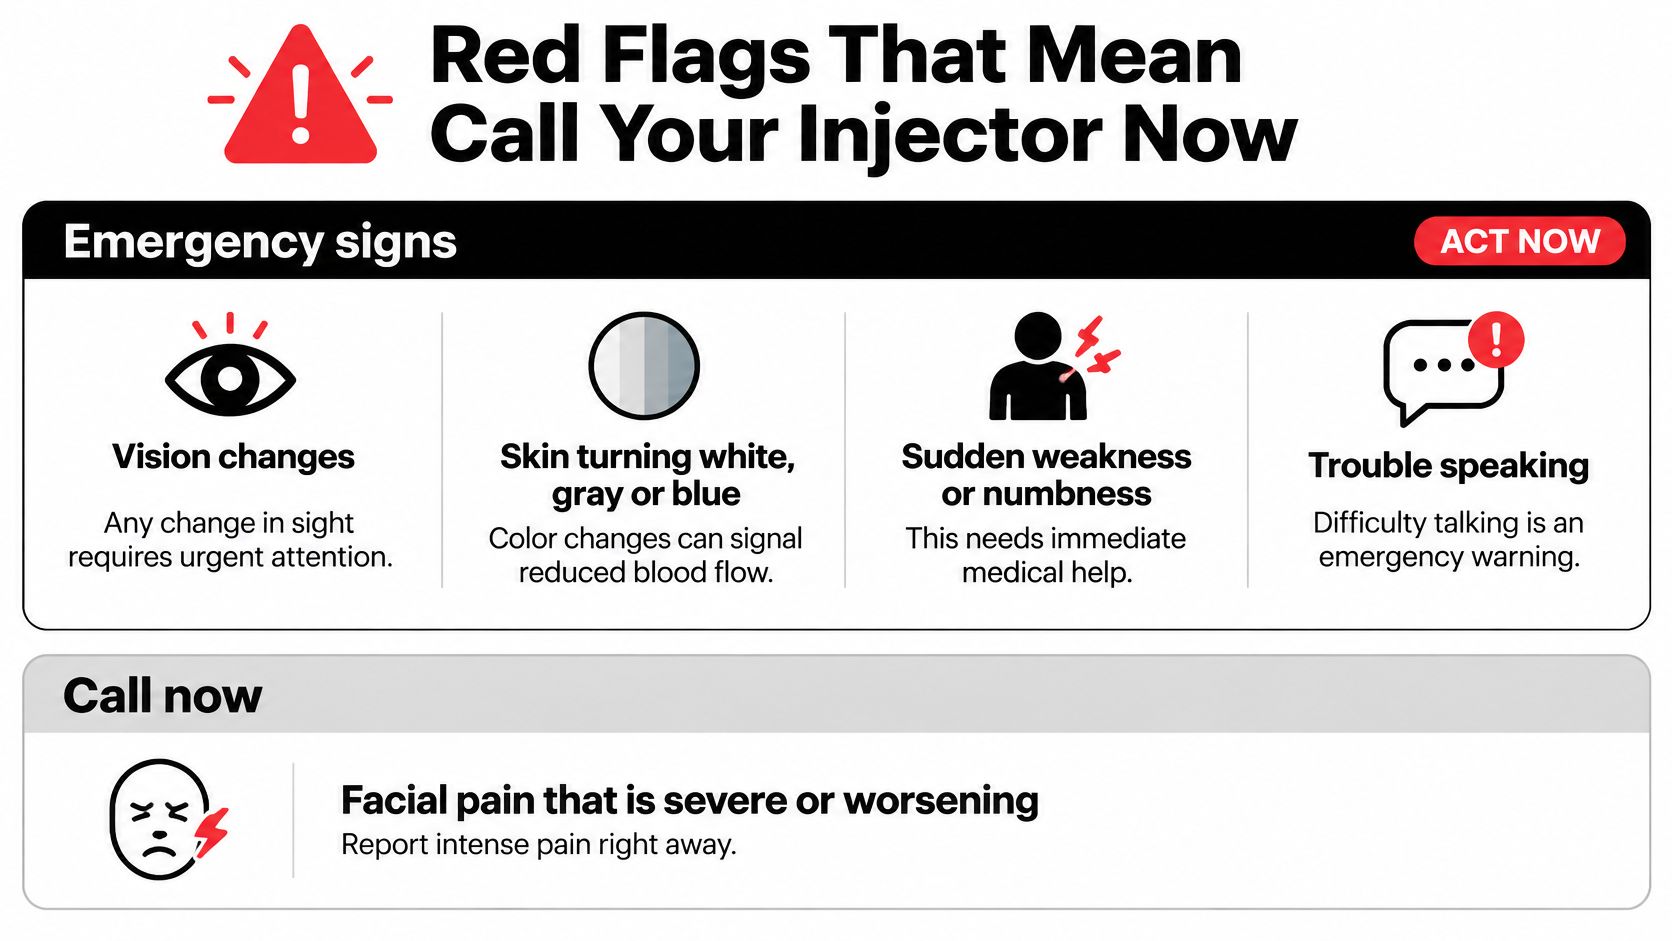
Careful sleeping can't prevent or treat a vascular occlusion, and a good pillow setup shouldn't reassure you out of seeking help. Serious filler complications are driven by vascular injury, not ordinary pillow contact, and they may begin quickly. Sort symptoms by urgency, not by whether you slept correctly.
An FDA review of filler-associated vision loss cases found that among 92 reported cases, 58% (53 of 92) developed visual impairment immediately, 20% (18 of 92) developed it 1 to 24 hours after injection, and 9% (8 of 92) developed it more than 24 hours later. That's why the first night and following day deserve close attention even when routine swelling looks mild. The FDA identifies accidental injection into a blood vessel as the most concerning filler risk, with reported outcomes including tissue necrosis, vision abnormalities including blindness, and stroke.
Emergency, Same Day or Review
| Sign | Category | Action |
|---|---|---|
| Vision changes or sudden vision loss | Emergency | Seek emergency care now |
| Skin turning white, gray or blue | Emergency | Seek emergency care now |
| Sudden weakness, numbness, facial drooping or trouble speaking | Emergency | Call emergency services now |
| Pain that escalates or feels out of proportion | Same day | Call your injector right away |
| Cool skin, dusky colour or fast-growing swelling | Same day | Call your injector right away |
| Ordinary swelling and tenderness that improve each day | Expected | Keep the sleep routine and monitor |
| Persistent asymmetry, nodules or new warmth after the first weeks | Clinician review | Book a visit with your injector |
| Problems still present after 14 days | Clinician review | Contact your doctor or injector |
Severe headache, dizziness, confusion, facial drooping or trouble speaking also belong in the emergency group. Don't drive yourself or wait for a callback if those symptoms appear. Call emergency services and tell them you've recently had a facial filler injection.
For escalating pain, blanching, dusky or cool skin, rapid swelling or fever, contact your injector the same day, or seek urgent care if you can't reach them. Photos can document a change, but they can't replace an in person assessment of circulation, pain and skin temperature. If you're unsure whether puffiness is routine, compare your symptoms with the patterns described in our guide to swelling after filler, then call rather than guessing.
Decide When to Return to Your Normal Sleep
Return to normal sleep when your cheeks meet three checks, not when a date on the calendar arrives. Waiting two extra nights on your back is better than going back early while swelling or tenderness is still shifting.
The Three-Check Decision Rule
- Swelling check: Swelling is mostly gone and is not increasing from day to day.
- Comfort check: The cheek tolerates light touch and gentle pressure without pain.
- Warning-sign check: No red flags have appeared, including unusual colour change, escalating pain or visual or neurologic symptoms.
Timing varies by product, so injector guidance matters more than a single deadline. An FDA-reviewed cheek and chin filler patient brochure reports that treatment site responses typically resolve within 2 to 4 weeks for cheek and chin treatment. Use that range as context, then follow the product specific plan your injector gave you.
Once early swelling has settled and your injector has cleared devices, the Barb N.P. Facial Mask can be an optional part of your skincare routine. It has a lightweight, ergonomic fit for hands-free use, and its adjustable settings let you personalize treatment. Red light penetrates to help stimulate collagen production, reduce the look of inflammation and support skin healing, and the mask offers a gentle, painless at home routine. Choose the setting and timing your injector recommends, and do not use it to press on a tender cheek during early recovery. It supports skincare, but it does not treat or prevent filler complications.
If all three checks pass, return to normal sleep in stages. Start with one familiar position for part of the night. If any check fails, stay propped up, avoid direct cheek pressure and book a follow up with your injector before changing your routine. I recommend keeping the simple back sleeping setup until touch feels easy and morning swelling stays stable.
If you're planning cheek filler or refining your recovery routine, BotoxBarb offers personalized injectable care and medical grade skincare guidance led by Barb N.P., with convenient booking and carefully selected at home essentials. Visit BotoxBarb to explore treatments, shop recovery friendly skincare, or book a consultation and leave with a sleep and aftercare plan designed for your treatment.